Introduction
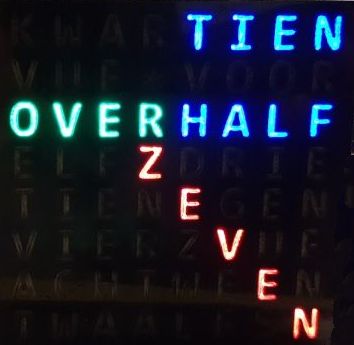
My son Marc and son-in-law Maarten are fanatics in the field of electronics and software. They live at 80 km from each other but often they still confer with each other on some hobby project. For example, they recently conceived a plan to make a so-called "Word clock". The current time is not displayed with numbers and / or rotating hands, but with words such as: TEN OVER HALF SEVEN (Dutch)
See also the demo video that Maarten made on a test setup: click here.
The transparent letters of these words are on a panel that is not transparent for the rest. Behind each letter there is an LED light that can illuminate this letter at the command of a software program in a microprocessor. By selecting the correct letter combinations the indication of the current time on the panel is thus established at a freely selectable interval of, for example, 5 minutes.
This kind of word clocks are also for sale, but they cost at least about 100 to sometimes several thousand Euros! Besides that, it is of course also much more fun to make such a clock yourself where you can also determine the functionalities yourself and that for less than 10 Euro for an 8x8 LED matrix and a microprocessor such as those are for sale at Aliexpress.
Maarten and Marc have each decided to make such a clock. Maarten uses the very suitable 3D printing technique for this. Marc does not have such a 3D printer and therefore chose a somewhat more traditional version for which he engaged me as a model builder.
Because my expertise in the details of the hardware and software is quite limited, I can refer to the "Github" website of Maarten Pennings for this; click here. This also applies to the details regarding the 3D printing of the housing.
I will therefore limit myself further to more general descriptions of this project and more specifically to the physical construction of the clock with, among other things, a wooden housing as I made it for Marc in my workshop with the machines and tools that I have available.
The design.1. The choice for the time interval.
For the interval between two time indications, 5 minutes was chosen because an interval of, for example, 1 minute is practically difficult to "handle", it would also certainly lead to a rather restless display behavior of the clock. To get a good idea of the current time, an accuracy of +/- 5 minutes is usually sufficient. It is also not the purpose of this hobby word clock to ever string every watch or radio controlled wall clock with regard to the accuracy of the time indication.
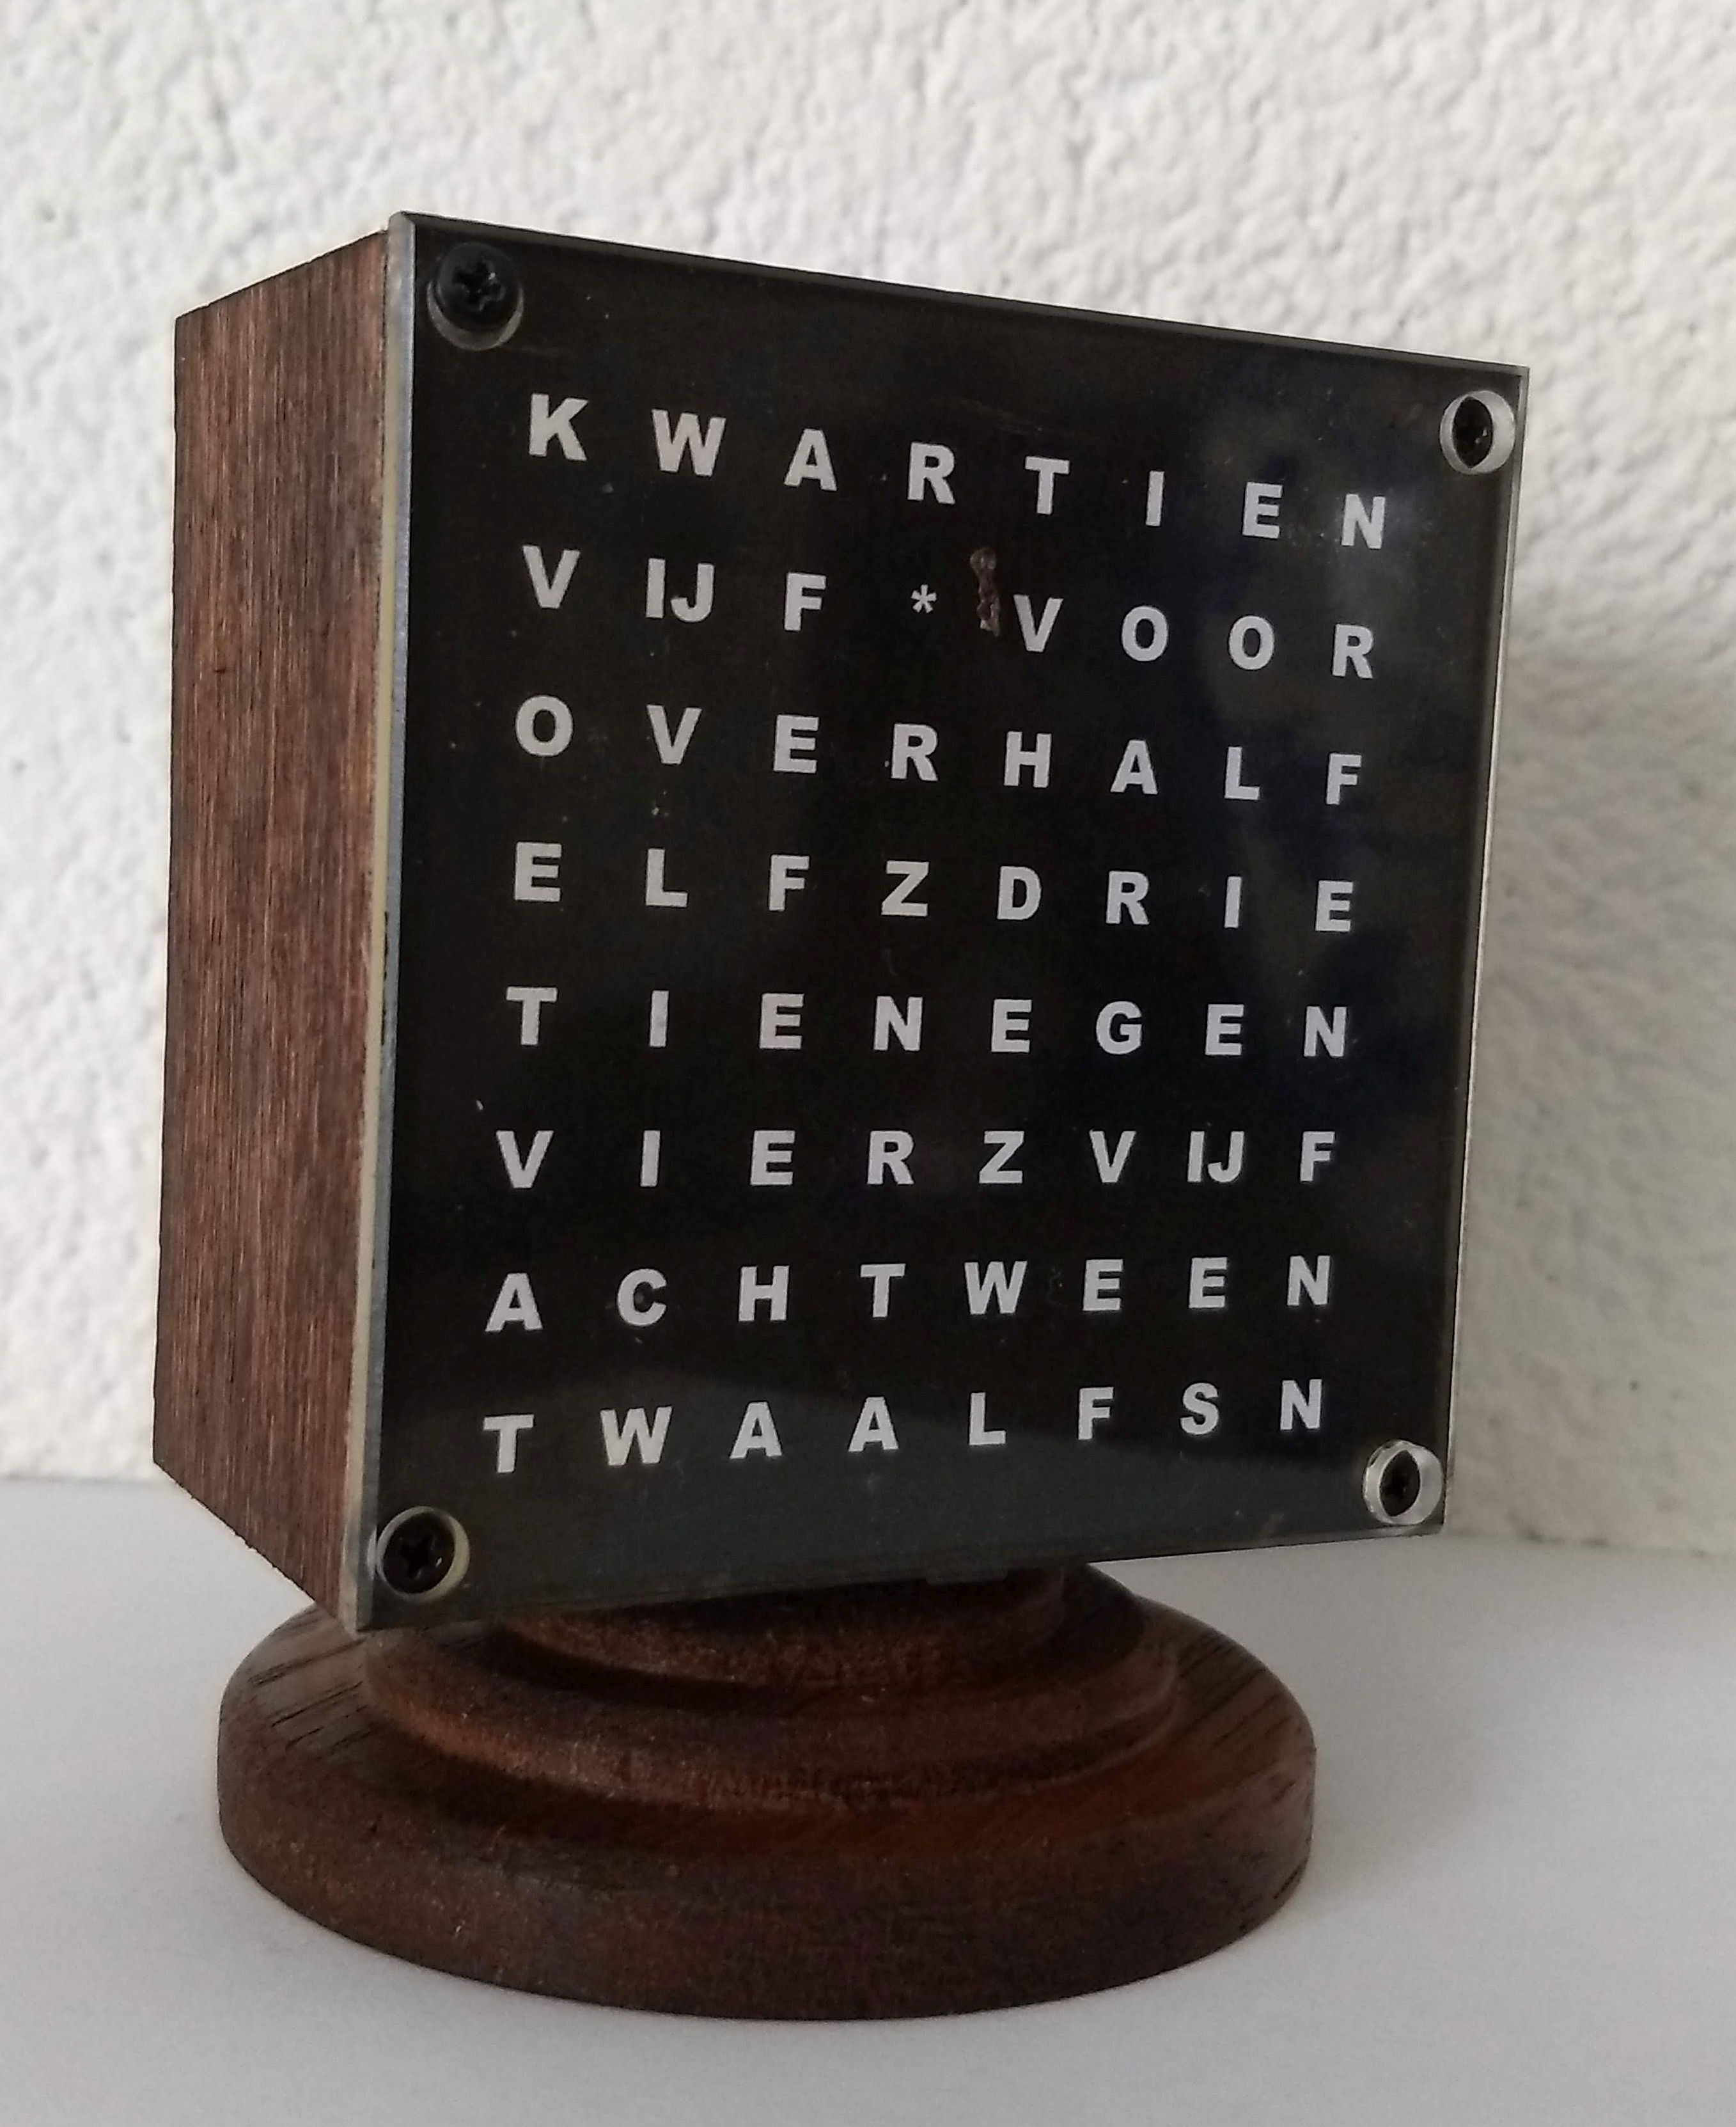
To display the times with an interval of 5 minutes, 18 (Dutch) words are needed, namely:
- the 12 words: "een" to "twaalf"
- the 4 words: "kwart", "over", "voor" and "half"
- two additional words "vijf" and "tien" to indicate eg "vijf voor vijf" or "tien over tien ".
It was also quite a nice puzzle to arrange the letters on the flat screen in such a way that with an 8x8 matrix it is possible to display all times of the day with it. Marc has made a computer algorithm to determine this special arrangement of the letters. One concession had to be accepted: two of the words must be displayed diagonally, namely the "zes" and the "zeven"; the rest of the words are all horizontal.
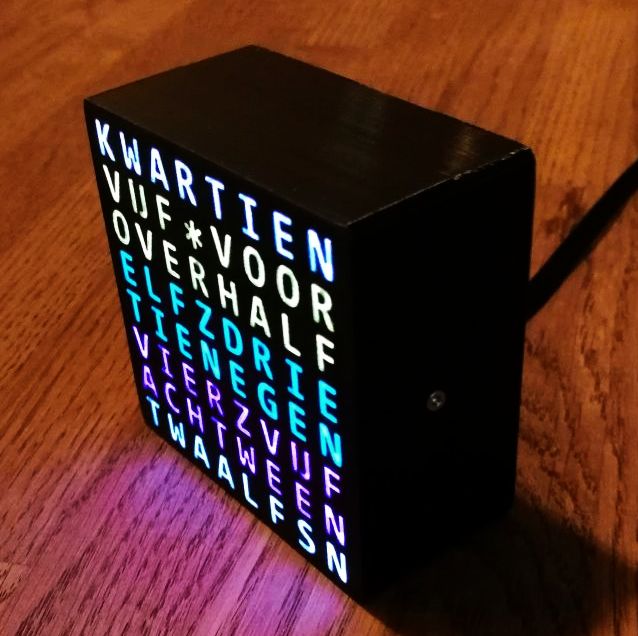
Spaces between the words cannot be represented as such with this 8x8 matrix either. The function of spacing is realized here by giving each of the words a different and contrast-rich color.2. The LED matrix.
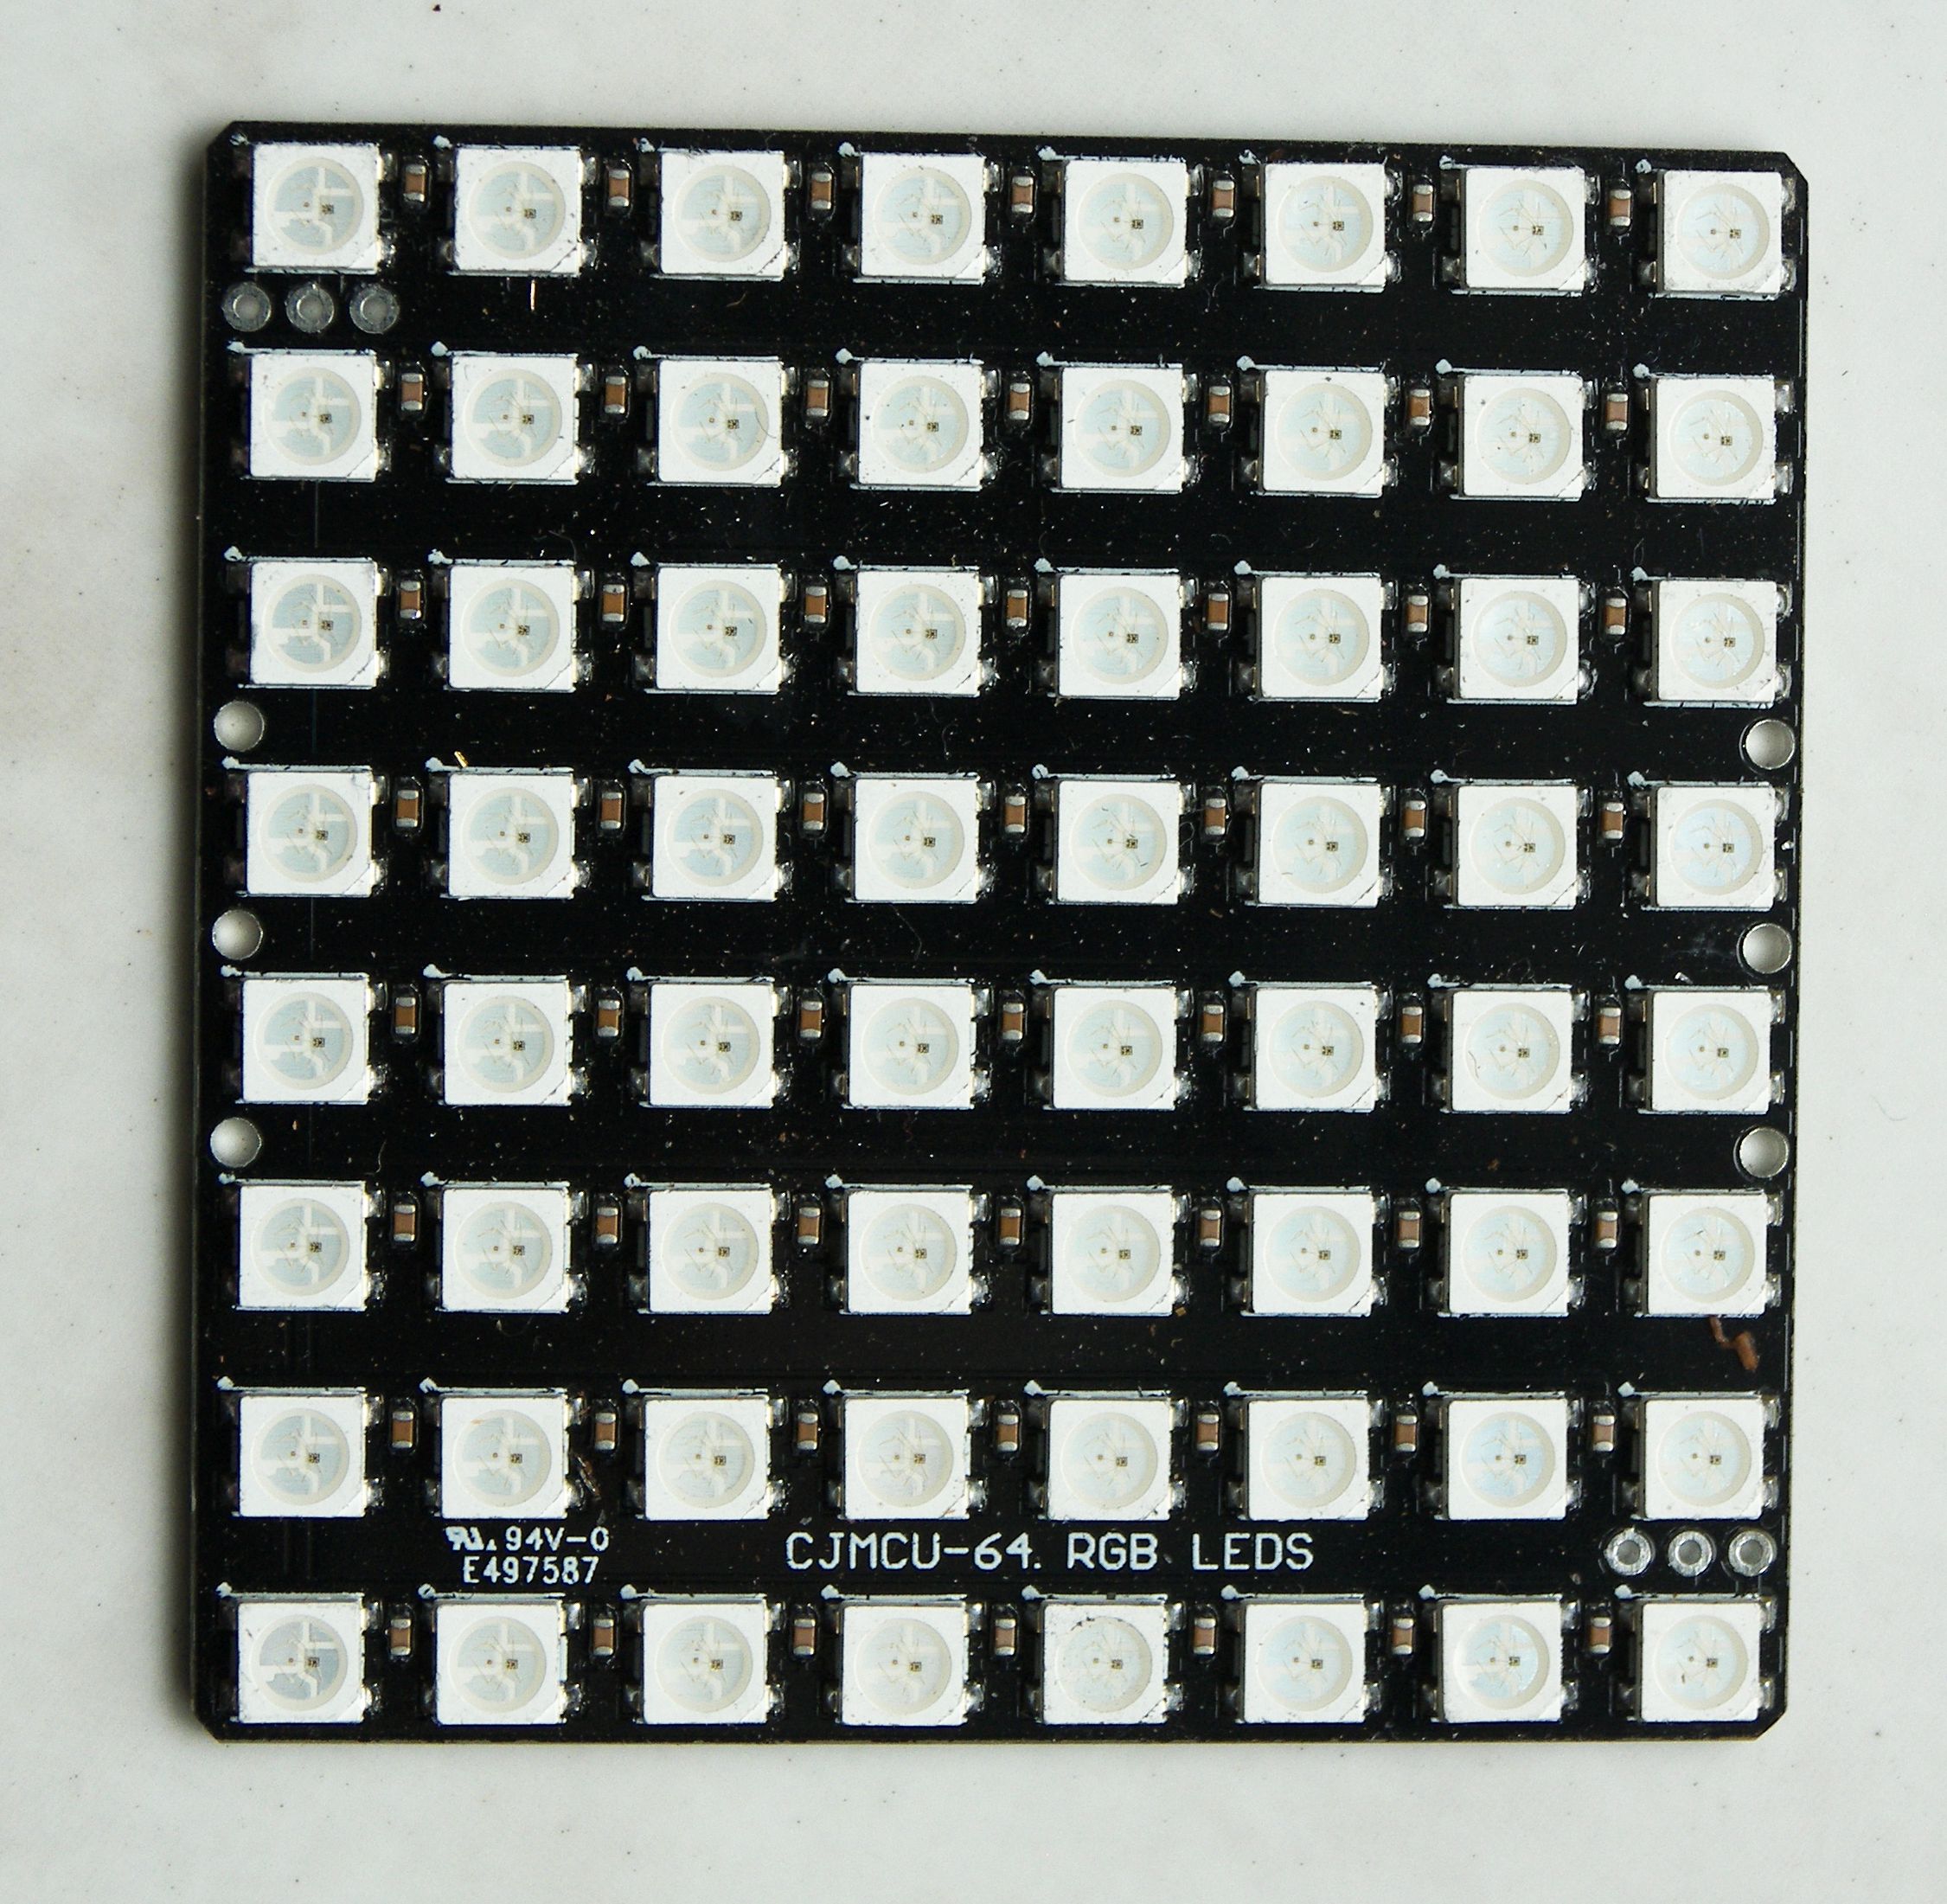
The LED matrix for this clock is the "8x8 LED matrix WS2812B" which is for sale at Aliexpress for 3.36 Euro; click here.
The so-called NeoPixels each contain a red, green and blue RGB LED and also a super small micro chip with which the LEDs can actually change to any desired color on the control of the software on the microprocessor.
The wiring of the 64 LEDs is implemented on the printed board in such a way that its connection to the mocroprocessor is relatively simple, at least for anyone who is more or less familiar with this matter. Also for this I can refer to the Github website of Maarten.3. The microprocessor.
The microprocessor "NODEMCU ESP8266" is also for sale at Aliexpress (1.85 Euro + 0.49 shipping); click here.
With this processor, a multitude of functions can be performed, such as controlling the LEDs and communicating with internet servers via a built-in WiFi system. This means that the current and exact time is continuously downloaded via the internet with the NTP server (radio-controlled clocks are controlled in a similar way, as with DCF from a radio station). The reading resolution of 5 minutes may be limited, but by synchronizing with atomic clocks, this WordClock always runs exactly within a time of 0.1 seconds, even taking summer and winter time into account.
For technical details about this electronic hardware and the software, I also refer here to Maarten's Github website.4. The physical structure.
No matter how one builds the clock, the condition must always be met that the letters are translucent and their surroundings are not. It is also necessary to prevent a light leak between letters that are neighbors, a so-called "bleed".
Maarten has succeeded in making the whole of plastic with a 3D printer. He used a printer with two printheads, one of which printed the black and opaque plastic and the other a transparent translucent plastic for the letters. A true piece of art if you ask me, but he did fine, see here again his Github website.
The somewhat more traditional version of the construction I made for Marc had to be done differently, if only because I cannot drill square holes to let the light from the square LEDs shine on the letters.
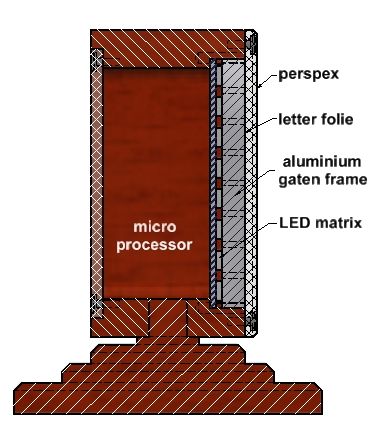
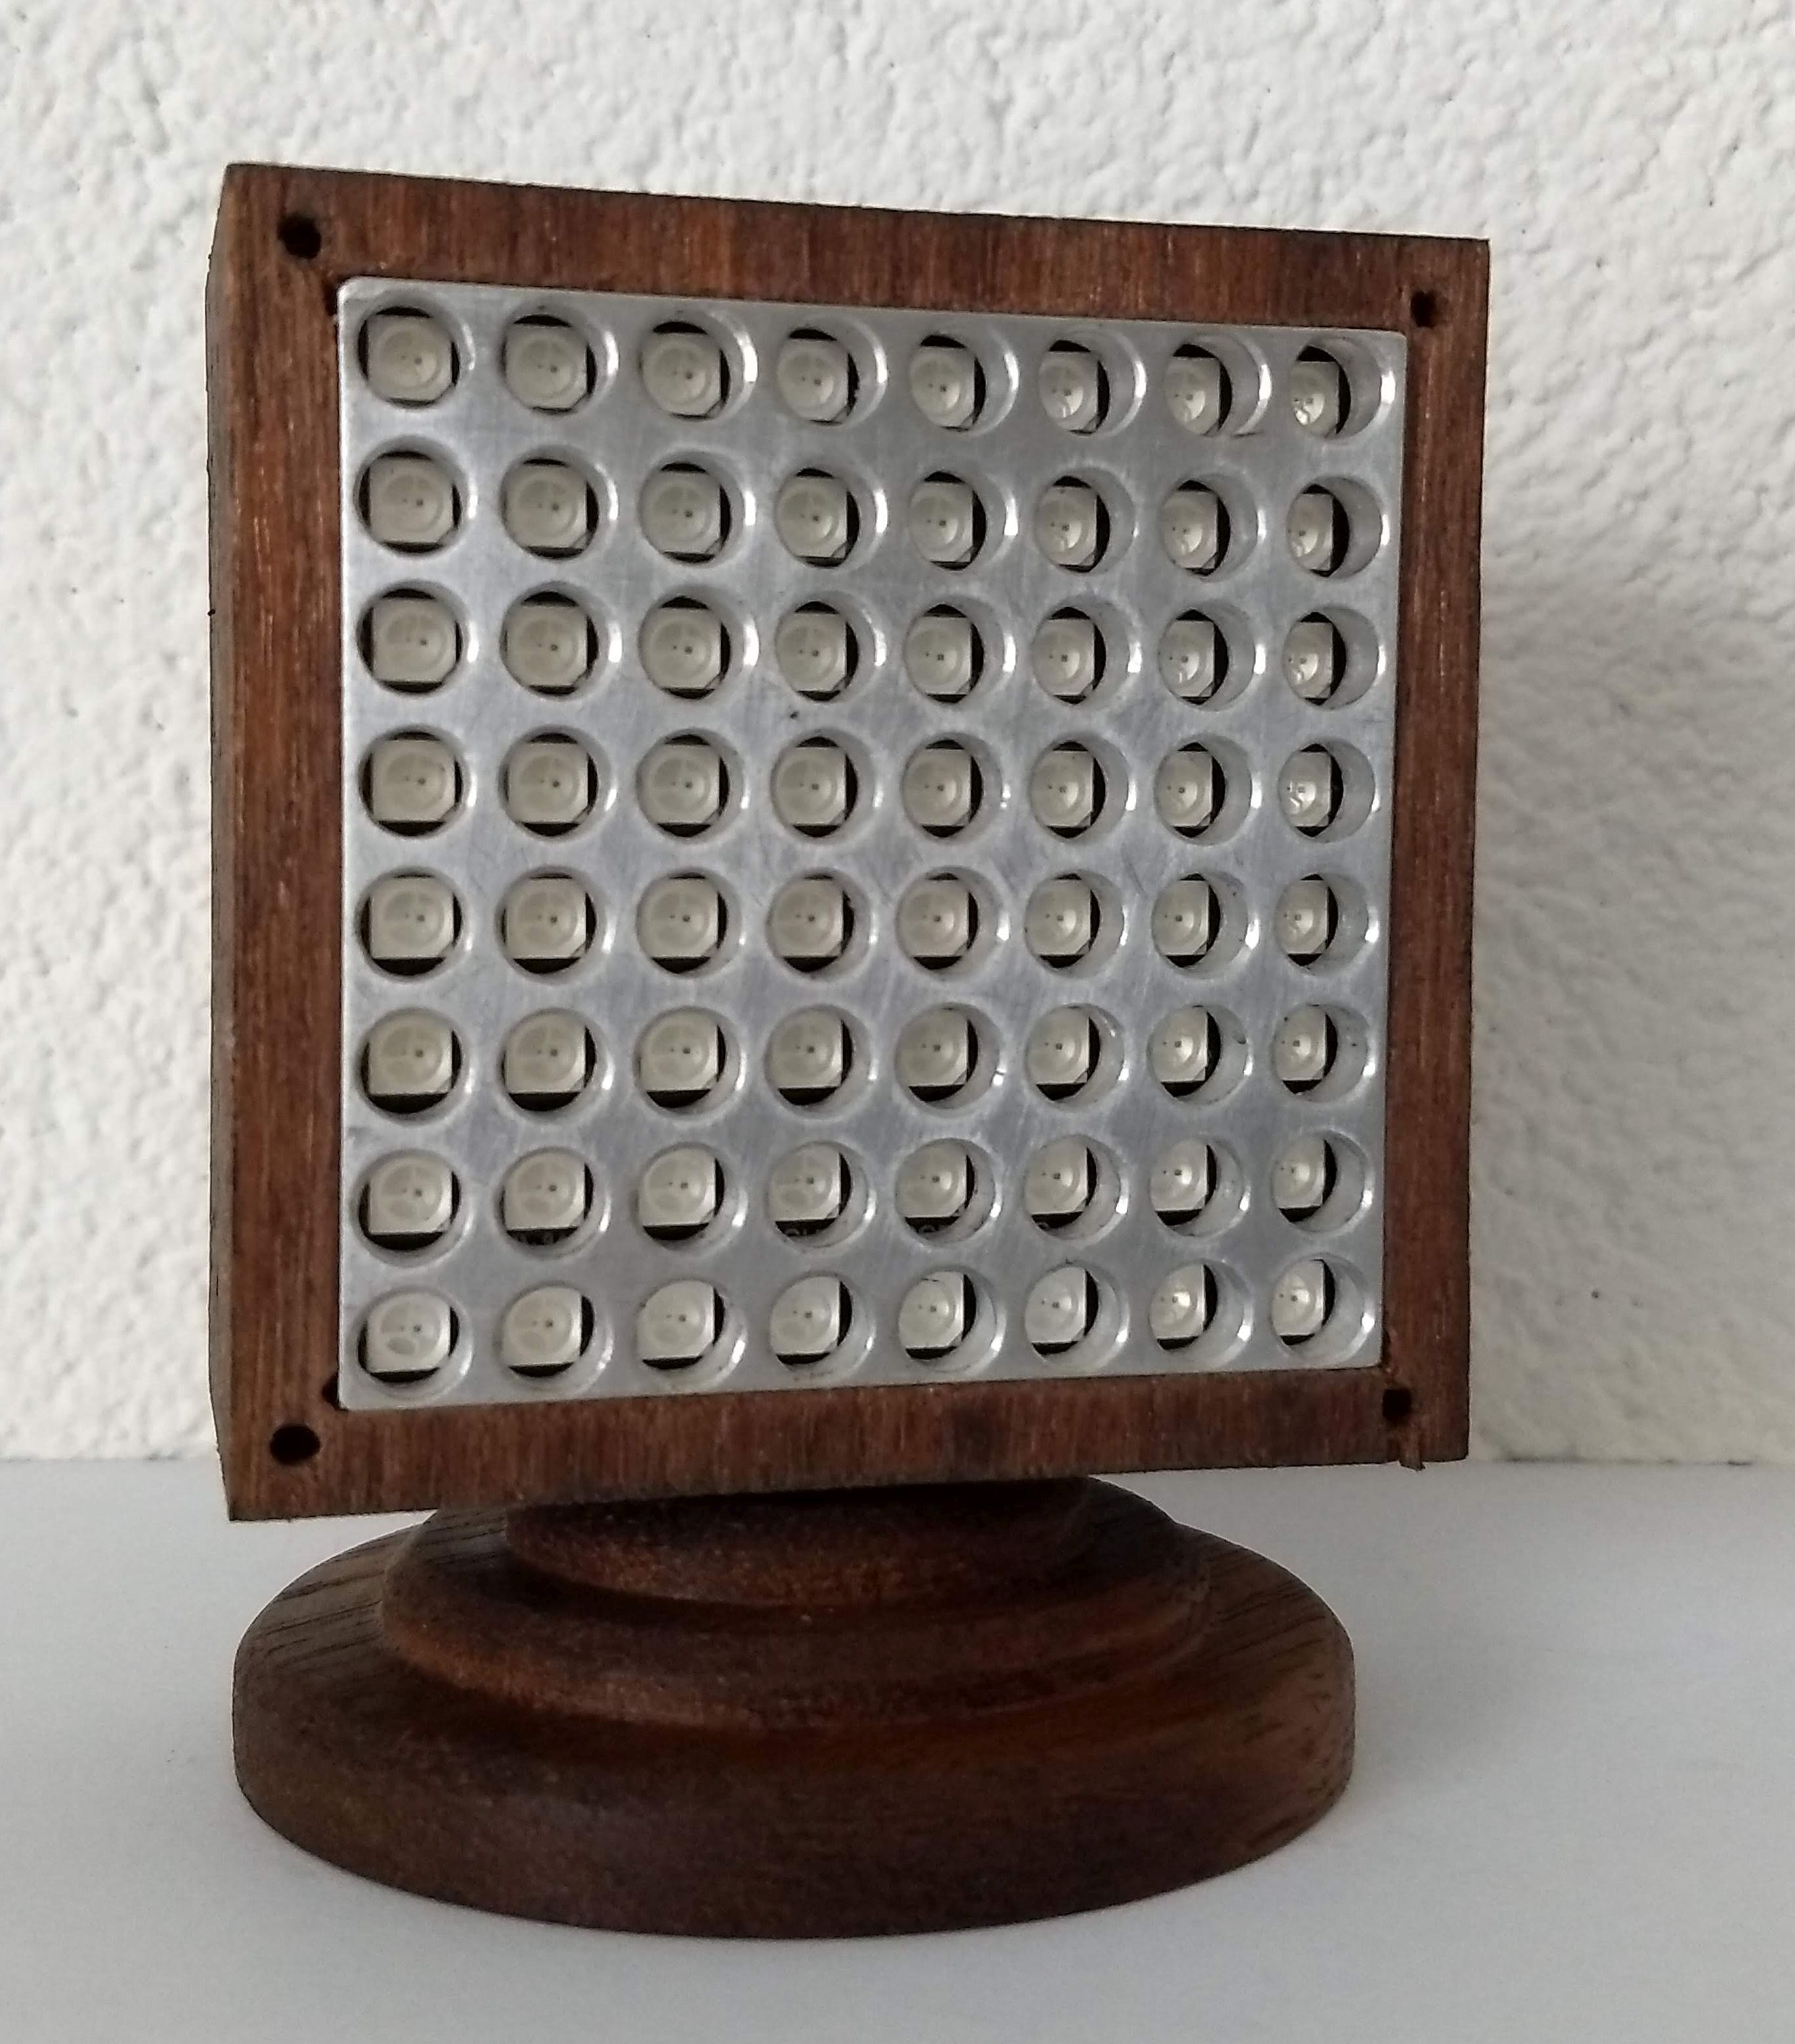
I decided to make a 6mm thick aluminum plate with 64 round holes with a maximum possible diameter of 6.2 mm that are on exactly the same pitch as the LEDs on the printed board, both in the horizontal and vertical direction which in the practice of the Chinese printed circuit board turned out to be somewhat different from each other. The aluminum frame is put on the leds and on top of that the black paper sheet with transparent letters that I made with Excel. The whole is mounted between raised edges in the wooden housing and a perspex plate that is screwed on the front with 4 small screws.
This results in circular beams of light with a diameter of 6.2 mm that shine through the letters with a defined circle of approximately 5.5 mm. Because the black ink on a single sheet of paper still lets the light through a little, I have placed two identical letter sheets exactly on top of each other to prevent this whitening.
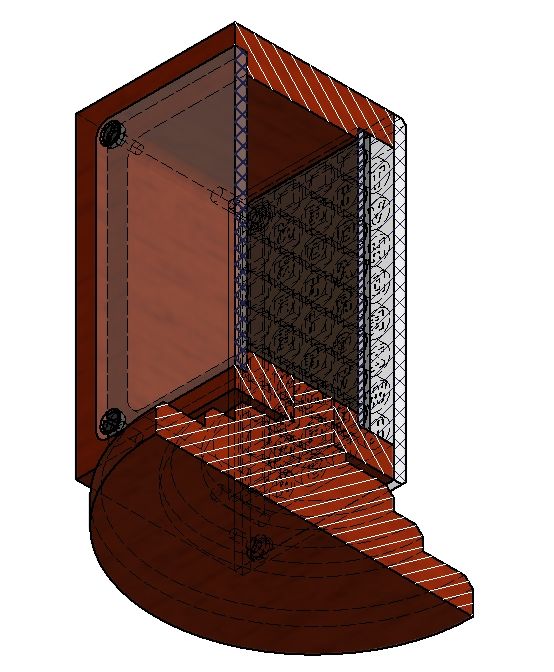
The right frame of this page shows images of the various parts and how they are stacked on top of each other. Below two CAD cross-sections as part of the drawing package I made of this version:
To make a request for this drawing package click here.
Log
March-15-2020
Maarten's WordClock is as good as ready, see the bottom image on the right frame of this page. He is still working on optimizations and possibly adding some extra functions such as animations at the transitions of the time displays. His progress can be followed on his Github website. Below a video of one of his animations:
Marc's version is also in the final stage. The wooden housing with the physical parts in it, the images of which are here on the right frame, is also ready. Marc will use the same microprocessor and the software as Maarten has done. It remains to assemble the electronic parts in the wooden housing and to connect the microprocessor and the LED matrix together and to test the software. Marc also has some plans to add some extra functions.
July-23-2020
Marc's clock is ready now and it works great. I am now making the same copy for myself. The wooden housing is already finished and I now have to wait for the LED matrix and the microprocessor that Marc has ordered for me from Aliexpress. As usual, there is a short wait for delivery from China.August-28-2020
All parts for my Word Clok were shortly delivered to Marc by Aliexpress. I have now also made clamp pieces for securing the USB bus for the 5 volt power supply and a switch for choosing some software options such as connecting the microprocessor to my WiFi modem.
The clock works excellently and it is now only sufficient to connect the 5 volt power supply from a mains adapter with which the software receives the exact current time within a few seconds via the WiFi connection with the NTP server.
This makes the project very successful and to my great satisfaction.Below the YouTube construction video that I made today of my Word Clock version:
Also a short demo:
 Printed circuit board
with 8x8 NeoPixels
 Aluminum hole frame
 Paper letter sheet
 Wooden housing
 With Printed circuit board
8x8 NeoPixels
 With Alu hole frame
Complete assembly
version "Marc"
3D printed Word clock version "Maarten"