Introduction.
Already in 2006 I designed the " Simple 2-stroke engine Debbie ", click here for the concerning page. I must say that this is a proven successful model, judging by the very many times that this engine was copied successfully by modellers from all corners of the globe as far as it was reported to me.
I myself have always found the "Simple 2-stroke Debbie " something gross and not one of my most attractively looking models. This engine is running fine though, but the behaviour is quite restless because balancing-out a 1-cylinder engine well for 100% is hardly or not possible.
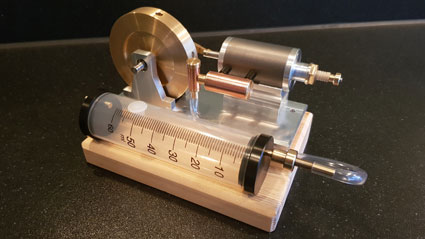
All this led me to make a new and significantly simpler and smaller version of this engine with a much serene behaviour. Because of the much smaller dimensions I baptised him "2-stroke Puppy".
It looks to me that this will be a very suitable model engine for modellers with rather small machinery equipment.
The design.
Recently I got MK1 replica of a fellow modeller at my desk because he could not get his engine to run properly. Yet it still surprised me that I needed so much time to discover the causes of his problems and to solve them in which I finally succeeded well by the way. It shows once again that making such a model engine according to a drawing plan is still something else than to let it run properly. Problems often are hidden in a small corners and sensitivities are usually located in the adjustment of the process other than in the mechanical work-out.
I learned from this "repair" that the design of this 2- stroke engine could be further simplified and improved on a number of points so that it not only will be easier to make it but also will be more reliable as far as the 2-stroke process is concerned. This results in the MK2 design.
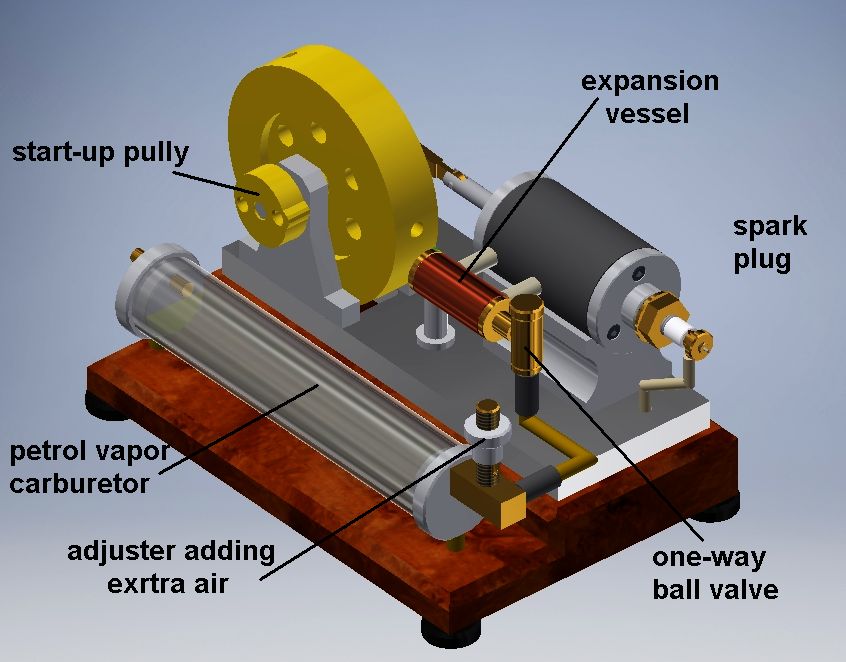
The below CAD figures illustrate the MK2 version of this "2-stroke Puppy"; update date December-23-2019:
Some characteristics :
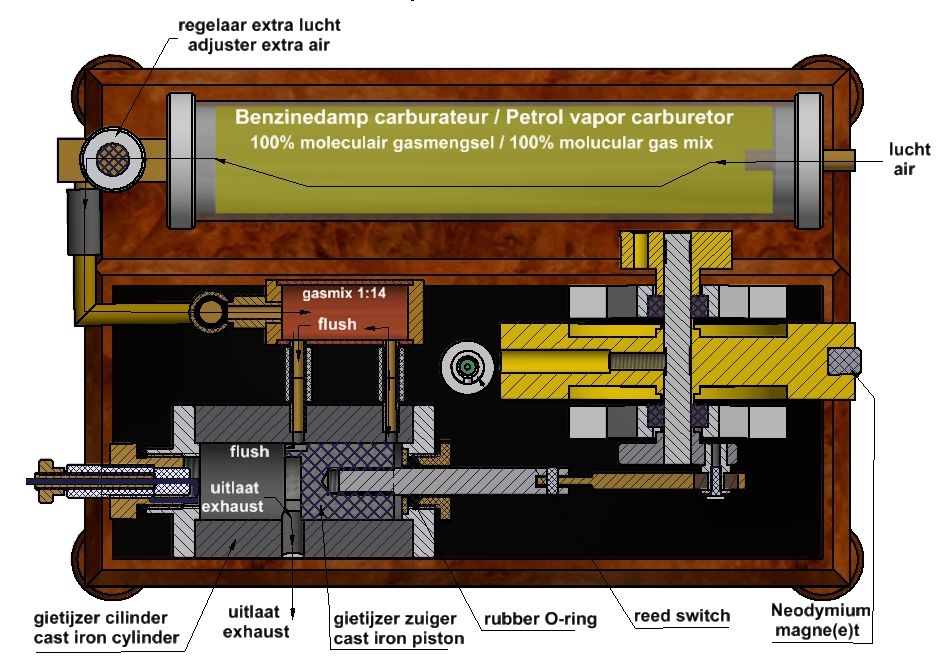
1. The cylinder is made of pearlitic cast iron GG25. Together with the aluminum support underneath this combination on the aluminum mounting plate acts as a good heat-sink so that the temperature of the cylinder will remain well below acceptable values.
2. The piston is also made from GG25 grey cast iron without a piston ring. With this combination no forced lubricating or cooling facilities are required. It is advisible to only put a tiny droplet of oil or WD40 on the piston from time to time through the exhaust opening in the cylinder to keep the piston and cylinder surfaces "in good condition". Do this always before you store the engine for a longer time.
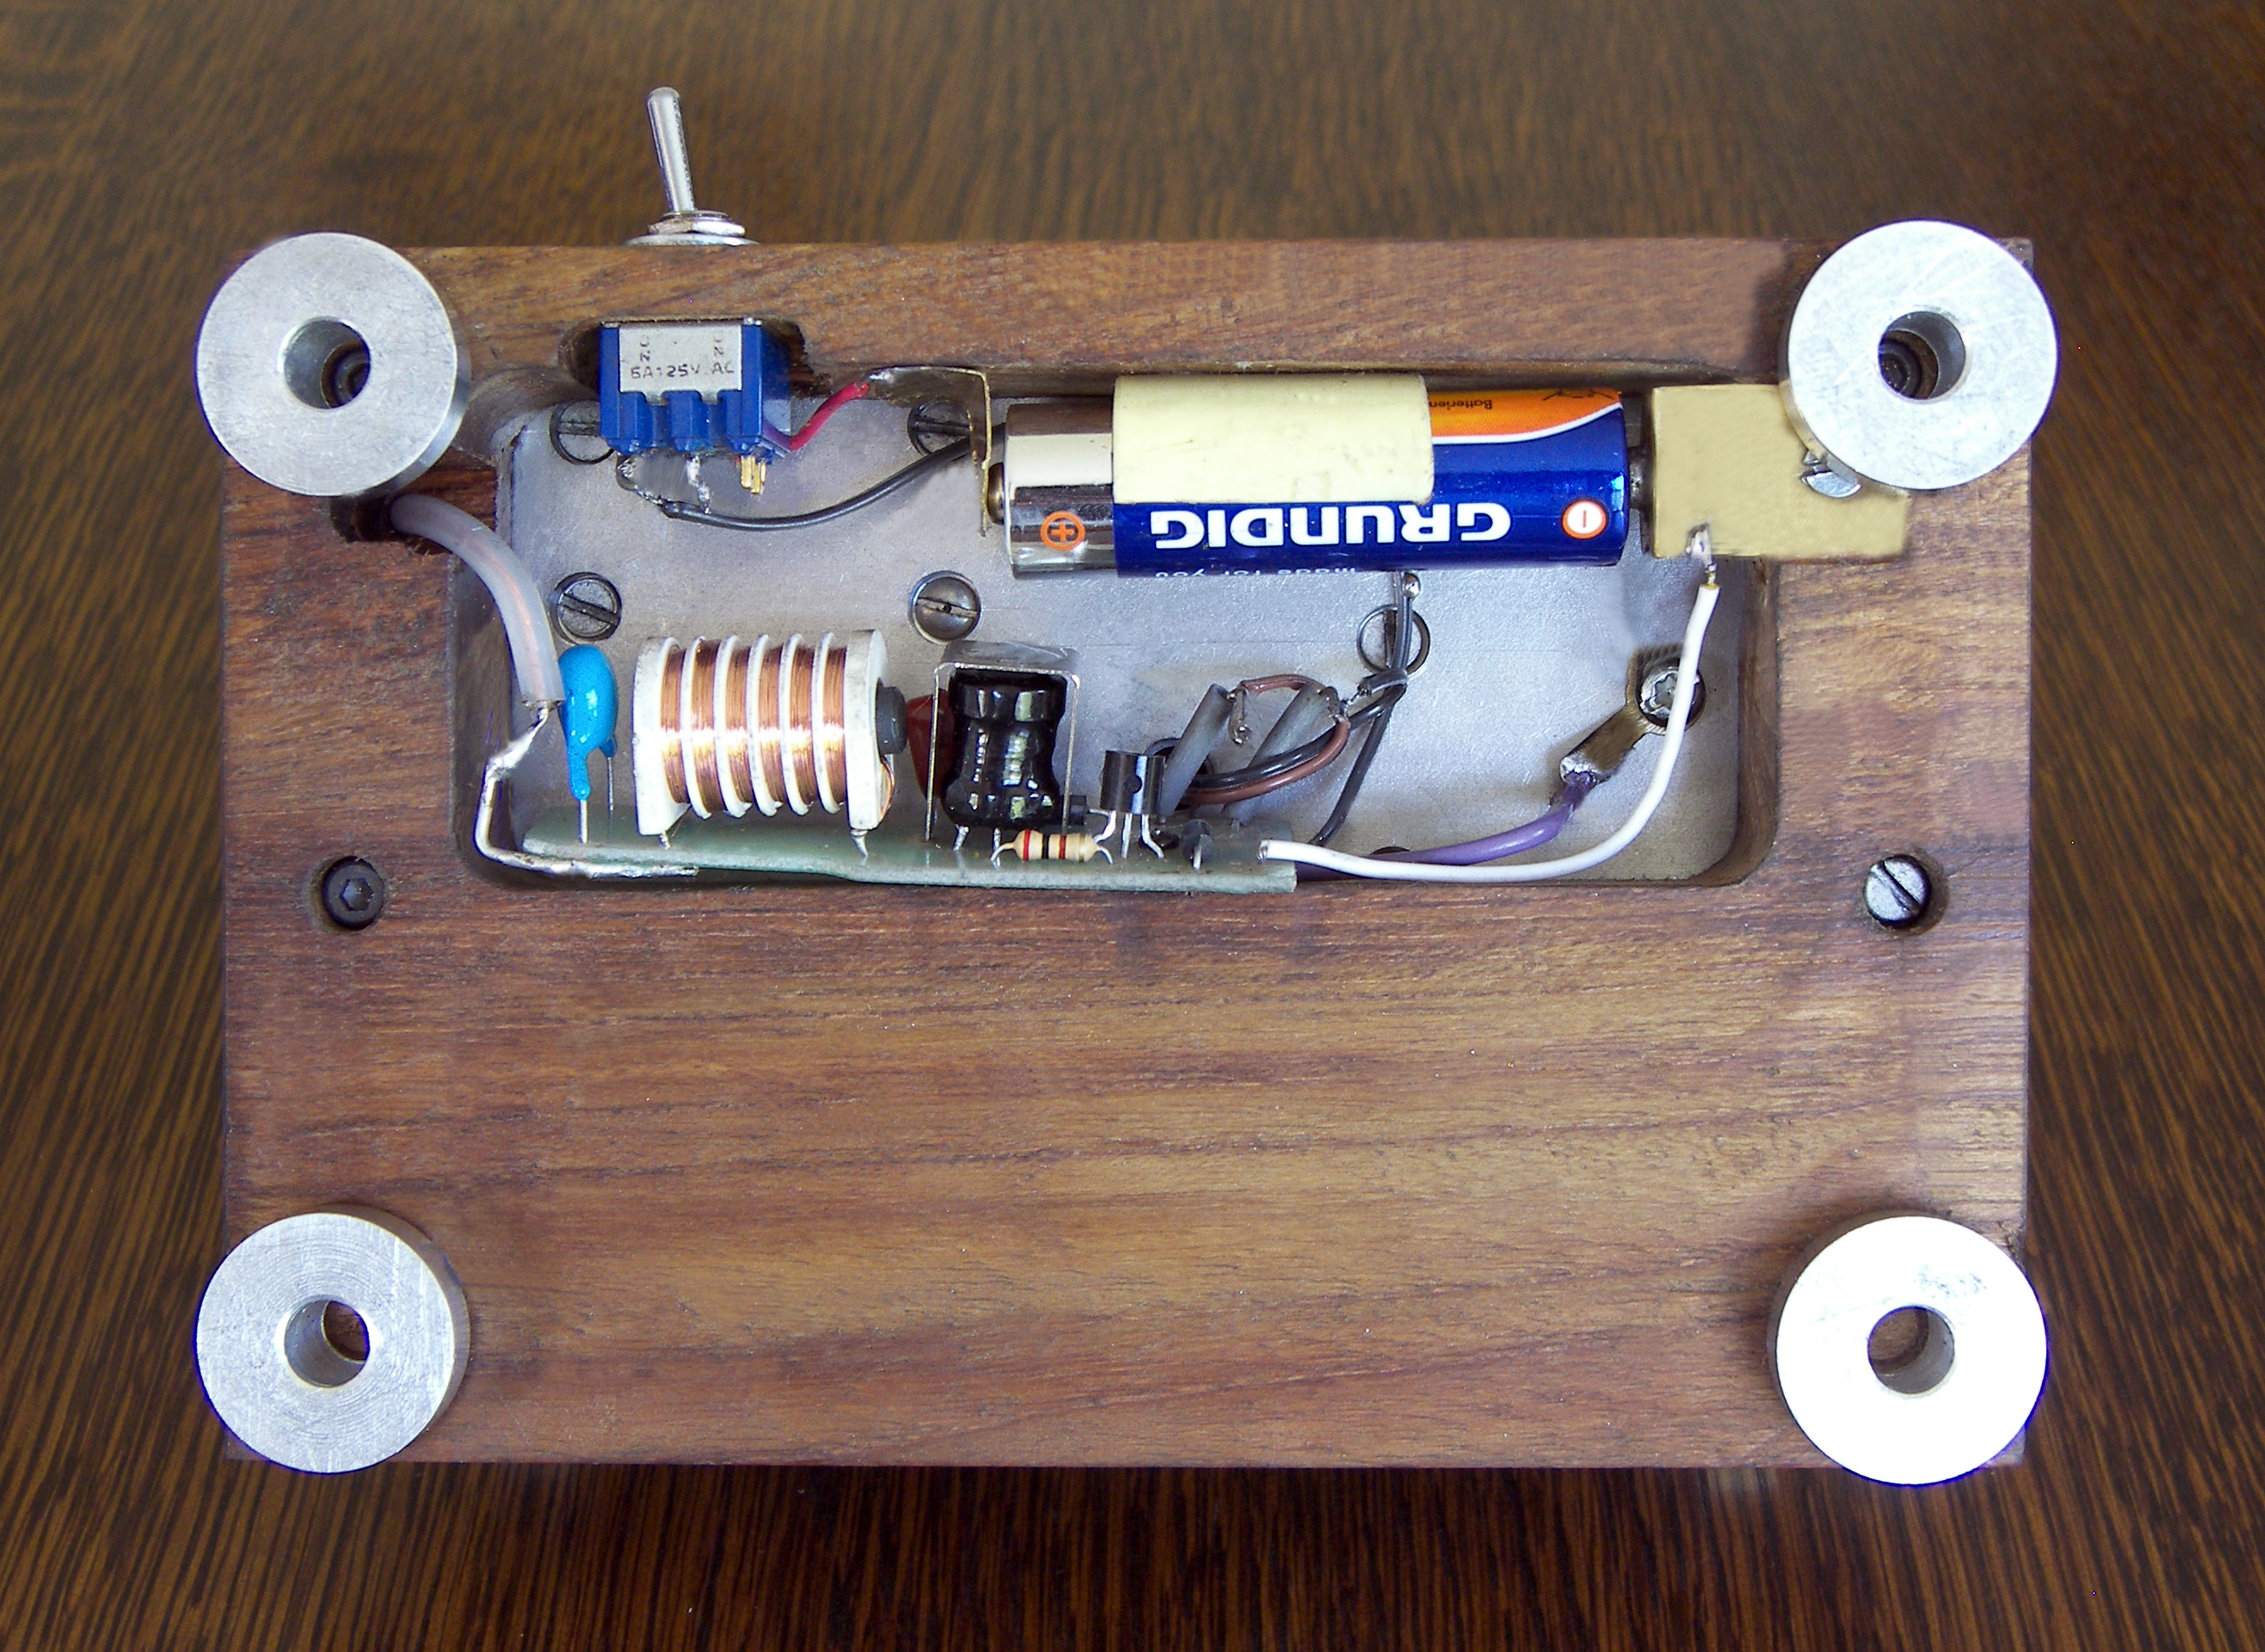
3. The sparks are made by the "Mini Blokker circuit" that is triggered with a very small reed switch and a Neodymium magnet in the flywheel or with a micro switch below a start-up/cam disc on the crank shaft. This spark circuit is built into the wooden base together with the 1.5 volt penlite battery.
The spark plug itself consists only of a Teflon insulator with a high-voltage electrode of spring steel wire soldered in a 3mm thread-end. TheTeflon insulator is screwed into a brass housing that is screwed in the cylinder head. These thread connections in and on the Teflon insulator are also automatically 100% airtight.
4. The Petrol vapour carburettor is an elongated glass variant of the standard brass version that would be too big for this small model Puppy engine.
5 The dimensions and weight of this " Puppy" are considerably smaller than those of the "Simple 2-stroke Debbie ". To give you an idea: five to six Puppy's will fit in a normal shoe box while the "Debbie" model is just a little too big for such a shoe box. The " Puppy" weighs about 500 grams which is over 10 times less than its big predecessor.
The only thing that is exactly the same is the 2-stroke process itself.
The elaboration.
1. The cylinder bore.
The cylinder bore must be well cylindrically and pretty smooth. Honing is the best method, but it can also be done with an adjustable reamer if as one does not have honing equipment available. Proceed as follows:
Drill the cylinder hole globally and then turn it with some 0.1 mm undersized diameter. Then ream the bore manually with an adjustable reamer because then the reamer will seek itself in the cylinder bore. Clamp the reamer in the vice with the flat end of the cone; so turn the cylinder manually over the reamer and not the other way around. Add ample oil while reaming. Turn the cylinder several times until the cylinder slides smoothly over the reamer. Then repeat this procedure with the reamer set a fraction bigger. Repeat these operations until there is actually no diameter difference measurable over the entire length of the bore; then the bore surface will be nicely smooth also.
The bore diameter does not need to be exactly equal to that of the drawing because the piston is made nicely fit hereinafter; see under below point 3.
2. The guiding of the piston rod in the cylinder bottom plate.
The piston rod must be substantially leak-free and with relatively low friction glide up and down through the botom cylinder flange. The hard-line of the cylinder bottom plate must coincide as well as possible with the center line of the cylinder bore in order to ensure that the piston does not go wring. Therefore, the cylinder plate has a raised edge which fits with a pure fit in the cylinder bore. By clamping the plate cylinder with this upright edge in the lathe the bore for the piston-axis can be made nicely centrically with respect to the center line of the cylinder bore.
Because it still is difficult to get these hard-lines together exactly 100% I put a ruberen O-ring over the piston axis which lies in a chamber in the cylinder bottom plate. This O-ring must be lightly pressed with a brass locking piece which is screwed in the botom cilinder flange.This chamber has a slightly larger diameter than that of the O-ring so that the plunger-shaft will automatically seeks the center line of the cylinder in the vertical plane. The diameter of the bore in the cylinder bottom plate is also somewhat larger than the diameter of the piston-axis in order to prevent that axis touches the cylinder flange2. The guiding for the piston rod.
The piston rod must be substantially fit leak-proof in the guide bush in the lower cylinder flange and walking up and down in it with a relatively low friction. The hard-line of the bore the cylinder flange has to exactly coincide with the hard-line of the cylinder bore in order to ensure that the piston does not twisting in the cylinder. Therefore, the cylinder flange has a raised edge which fits exactly into the cylinder bore. By clamping the cylinder flange with this upright edge in the lathe the bore for the guide bush can thus be made nicely centric-ally with respect to the centre line of the cylinder bore.
3. The assembly of the piston and its axis.
In order to ensure that the hard-lines of the piston and that of its axis exactly coincide it may be best to proceed as follows:
- Turn the piston with a 1 to 2 mm diameter excess and make the central screw hole in it for the piston axis;
- Make the piston axis with the threads on both sides according to the plan and screw it in the piston with some Loctite 603. Preferably, cure the Loctite at 50 to 60 degrees Celsius for one hour creating a very strong and air-tight connection. Hardening at room temperature can also be done but that takes some hours for the same result;
- Turn back the diameter of the piston in small steps with the piston axis in the chuck of the lathe until the piston fits into the cylinder bore with the smallest possible clearance but in any case not exceeding 0.02 mm
4. The spark system
Because of the small dimensions of this Puppy it is not possible to build-in a standard automobile or motorcycle bobbin in the wooden base. Such bobbins are almost as big as the whole engine itself that is a complete mismatch.
Therefore, I have here again applied the mini circuit of a gas lighter Blokker; click here for the relevant page. The picture below shows the circuit in the wooden base with the 1.5 volt AA battery and the on/off switch.
Starting-up the engine
On the page of this Blokker system you find two alternatives for the modification of this circuit. The alternative 1 is the most simple in which the thyristor is simply replaced by a micro switch that can be mounted under the start-up/cam disc pulley; see CAD figures at the top of this page (the micro switch is not shown there). Because with this alternative 1 the contacts of the micro switch eventually will burn-in on the long run. I later made the alternative 2 with what the spark triggering is done with a reed switch with very low control current that drives the switching thyristor. One can use here also use a micro switch instead of the reed switch if wanted.
The spark has to come at the exact moment of maximum compression, so at the piston TDP position; this is rather critical.
Fill the carburettor half with normal auto car petrol or preferably with Coleman Fuel. Especially the first few times it is useful to start-up the engine using a hand drill machine comprising a nozzle with two 3mm pins that fit into the two holes of the start-up pulley of the engine. First turn the gas mixture regulator on the carburettor fully open and slide it gradually over the slot during start-up until you hear the engine is taking overt. Around that setting the engine will run well and you can vary the speed a bit by moving the regulator somewhat over the slot in the lead. Once the engine has run it can also be started with some firm manually pushes to the flywheel.
Below the YouTube video of the MK1 Puppy (I didnot make a video of the MK2 version yet):
Drawing plan
I made a CAD drawing plan for this Puppy 2-stroke MK2 engine; click here for a request.
! Video's below
are still MK1 versions !
Mooie replica van Jaap van Wijk:
Replica van Jim Aussie:
Very wel running replica made by
Leonidas Farmakis:
Replica made by:
Jorn van der Hoek
A free version made by
Walter Korthaeuer:
Nice relipca made by
Honda Forza: