Why an alternative for the classic carburetor ?
The carburetor is one of the most important parts of an I/C engine. It determines the performance and the behavior of the engine to a large extent. However, it is not easy to make a conventional carburetor. Also problems such as unreliable start-up, ‘flooding’ the engine, and carbon deposits on the spark plug are all too familiar. At least that is my opinion, and I am certainly not alone in this view.
Without claiming that it is impossible to make a reasonable operating classic simple carburetor, I dare to suggest that it is hard for most model builders to make one that gives really satisfying results.
That brought me to think about an alternative process that provides for a mix of 100% molecular petrol vapor (other than petrol droplets) and air with an ideal ratio of about 1 to 14. The idea was for a design that would make short work of those carburetor problems encountered by most amateur model builders.
The thoughts behind this alternative design
The task for a carburetor is to make a mix of air and petrol for combustion in the cylinder of the engine. A good carburetor must mix about 1 part of petrol with 14 parts of air. The petrol droplets must be as small as possible; the smaller the droplets, the better the combustion will be. Big or unequal formed petrol droplets often cause flooding the engine and/or carbon soot on the sparkplug due to incomplete combustion and, as a result, bad or irregular engine behavior. Ideal would be that the air is mixed with molecular petrol vapor instead of fluid petrol droplets.
Self made carburetors for model engines usually keeps far from this ideal. They don't reach a higher ratio then 1 to 10 and it is very difficult to avoid incomplete combustion. Insiders told me that it is almost impossible to make significant improvements with this kind of classic carburetors with a venturi, air throttle valve and petrol jet with needle and choke valve.
The theory about the ideal carburetor brought me to the idea to make an entire different carburetor design. The basic thought was that if air is lead through or over liquid petrol it will take molecular petrol vapor with it instead of liquid droplets. The only question was if the amount of petrol vapor would be enough to create the ideal ratio of 1 to 14. The fortune was with the the fool! Simple experiments with some petrol in a glass test-tube, closed with a rubber stopper with a metal tube in it taught me that the chance for success should be more than likely. I even found that there was more petrol vapor in the mix then necessary for the ratio 1 to 14. And that means that the combustion properties of the fuel mix could be influenced by adding some extra air between the carburetor and the engine and, with that, the speed of the engine.
Less than some experimental days delivered me the conditions for a childish simple carburetor with amazing good performances !
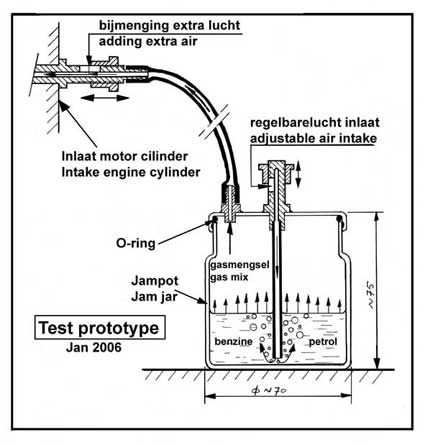
The prototype and the working principle
Below a sketch of the prototype with a jam jar and two independent air adjusters. With this I did my first experiments with the Otto 4-stroke engine.
On the lid of the jam jar there is a pipe with an adjuster to regulate the main in streaming air. This pipe reaches to the bottom of the jar so it plug in the petrol. A second pipe on the lid of the jam jar connects this carburettor to an adjuster for mixing extra air on the intake manifold of the engine with a rubber hose. The in streaming air bubbles through the petrol taking 100% molecular petrol vapor with it. The amount of air and with that the amount of available petrol vapor can be regulated by a restrictor on the main pipe. The homogeneous mix of air and petrol vapor is sucked in the engine cylinder and is combusting there for 100% during the power stroke.
Because the petrol vapor concentration of the primary mix in the jam jar is higher than required for the ideal ratio 1 to 14 extra air must be added to it via the restrictor on the engine intake manifold. In principle it could be possible to add this extra air in the jam jar already, but I discovered that it was better to do this between the carburetor and the intake manifold of the engine. The reason is that the extra air disturbs the ratio of the gas mix when it is streaming over the patrol in the jar because it l takes extra petrol vapour with.The first version with two independent air adjusters
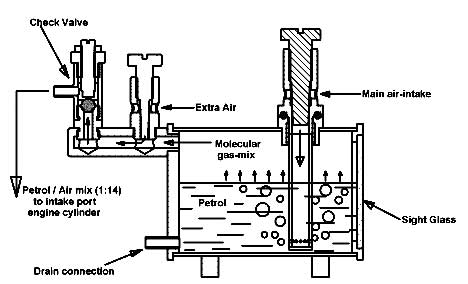
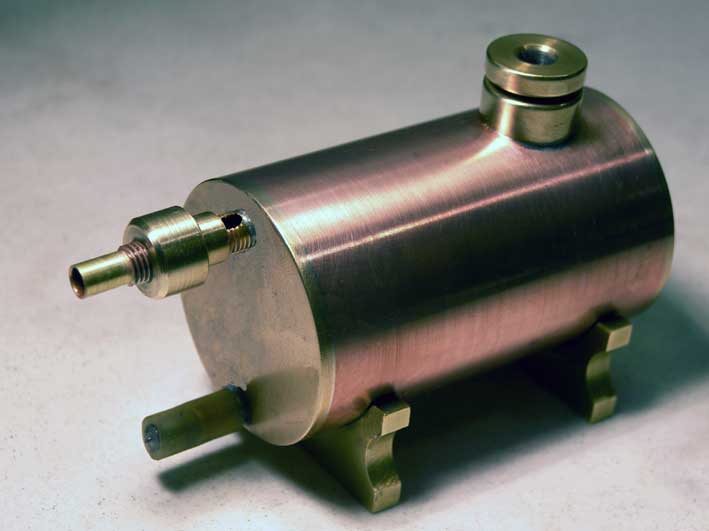
The first version of the petrol vapor carburetor was based on the prototype as described above.
Except for the sight glass the whole carburetor is made out of brass, not only because it is not fragile but especially to avoid possible dangerous static electricity caused by dry air steaming through the non conductive petrol. The brass tank is connected to the mass of the engine so eventually static electricity will automatically disappear.
The figure above also shows an integrated back stroke check valve which is always necessary for 2-stroke engines to avoid the compressed gas mix below the piston to be pressed back in the carburetor. With a 4-stroke engine this is only a safety measure to avoid back stream in case of an unexpected back stroke of the engine casing some petrol pushed in the open through the main in stream pipe.
This carburetor did work very well for all my 4- and 2-stroke stationary IC model engines with a lot of significant advantages compared to a classic carburetor that I will enumerate at the end of this page.
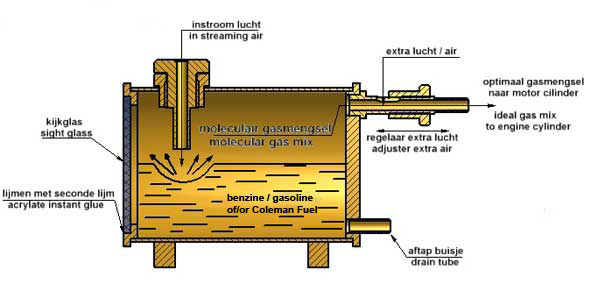
A simpler and improved version
Although the first version worked very well there was a single problem with it, at least an inconvenience. The right adjustment for starting up and speed regulation of the engine with the two independent air regulators was not that easy and/or required rather much experience.
So I made a new more simple and improved version; see the picture below:
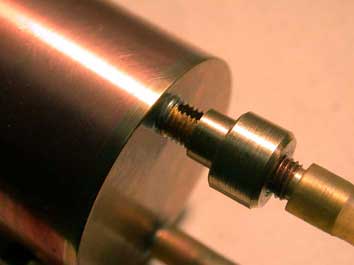
I found out that there was no need for an adjustable restriction for the main in streaming air in the tank and that only a regulator for adding the extra air was sufficient. This is not more than a simple threaded connection tube with a slot through what the extra air can pass. A nut on that pipe can cover this slot more or less with what the amount of extra air can be varied. This regulator can be made by every model builder with standard lathing work I think so that cannot be any problem.
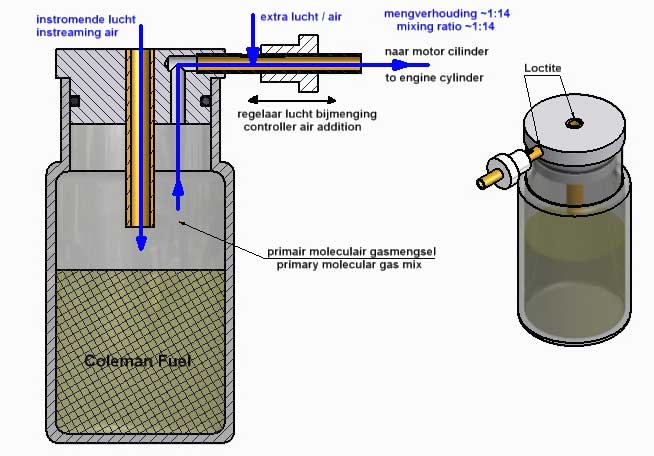
More or less accidentally I also discovered that it is not necessary that the in streaming main air is bubbling through the petrol to take more than enough petrol vapor with it. Stronger, with a short pipe that ends above the petrol surface all my IC engine run perfectly, may be even better. In general it appears that the adjustment of the carburetor is less sensitive with the short in stream pipe. It looks as if the composition of the gas mix is more stable without the bubbling. For my 2- stroke Hit&Miss engine this version of the carburetor is even a precondition! I explain the reason for that on the concerning page for this engine.
In principle it does not matter how big the tank is, but my experience is that the fuel surface should not be less than about 15 cm2 to ensure that enough gasoline vapor can be mixed with the in streaming air. For engines over 20cc cylinder content and / or with high speeds (=greater consumption) it probably is advisable to enlarge the tank.An additional advantage of the short pipe is the fact that no petrol can be pushed to the outside in case of an unexpected back stroke of a 4-stroke engine at starting up. In fact I now only use the short pipe for all my engines now.
The bubbling may be more spectacular to see, but I prefer the advantages of the short pipe more that the optical bubbling phenomenon. Besides, the in streaming air makes a dimple in the petrol surface that is well visible through the sight glass with what one can check if the engine is sucking in the gas mix that is very helpful in case of starting up problems.
Well considered this carburetor is not much more than a petrol tank with two simple arrangements with what the ideal molecular gas mix can be sucked in by the engine. Because this system performs excellent for at least stationary IC engine models it is a good example for a "hallmark of simplicity". The disadvantage is that it looks dull but that is the other side of simplicity most of the time.
I made a CAD drawing plan for this carburetor, available for every one interested; click here for a requestA extreme simple "spice jar" version
Recently (august 2015) I made an extreme simple version of this carburetor, using a small spice jar as fuel tank; see the figure and video below:
With this version you don't need to make a brass tank with glued-in sight glass. You only have to make a aluminium cover with two simple glued-in leads. So few and easy lathe work without any soldering. Filling these carburetor with fuel and emptying is also a lot easier. The jar may also be made of plastic provided that is resistant to the fuel.Also for this spice jar version I made CAD plans that are available for everyone interested; click here for a request.
The fuel and the adjustment of the carburetor
Normal auto car gasoline consists of various hydrocarbons with different evaporation rates and combustion values. The most volatile component must be mixed with a relatively large amount of air, reason why with fresh gasoline the regulator for the extra air must be opened completely first . Then during the start up of the engine (eg with a hand drill) screw the nut of this regulator very gradually over the slot until until you hear the engine is starting to run. Somewhere around this "0" position, the engine will easily start with fresh gasoline.
One often tends to set a richer mixture (= less additional air) when the engine will not start immediately, but that is absolutely wrong! So always start by setting maximum additional air (which hardly any gas mix from the tank) and then turn the nut gradually over the slot until you hear the motor is giving signs of life.
Depending on the motor gas mix consumption the very volatile fuel component will gradually disappear and the engine will run more slowly. At that time, reduce the additional air further until the desired engine speed is reached again. The situation will be more stable after that.A good alternative for auto car petrol is "Coleman Fuel" with what this separation effect of the fuel can be avoided to an certain extend. It is a super refined kind of petrol with the absence of very volatile and heavy carbon hydrogen components. The composition of this fuel is nearly constant so the adjustment of the carburetor is much less sensitive than with auto car petrol.
This Coleman Fuel is used for camping stoves, mainly because it is practically odourless, which also is an advantage for us. It can be obtained at every shop for camping attributes.
It is advisable to fill the tank not more than half full. Model engines up to 15 cc and with a speed of about 1000 RPM can run for 15 minutes or longer on that, which is more than enough for a successful demonstration run in my opinion.
The advantages of this carburetor design compared to the classic one
I found the following advantages of this new carburetor design:
1. Always 100% molecular petrol vapor in the gas mix. Consequently never any fluid petrol droplets in the cylinder and, as a result, no carbon soot or wet spark-plug, due to incomplete combustion;
2. The ideal ratio petrol vapor/air of 1 to 14 is easy obtainable. This very homogeneous gas mix provides for perfect running of the engine;
3. The engine is provided immediately with the right gas mix, so starting-up is very reliable and fast without choking. Choking is actually not possible with this system;
4. In fact it is no longer possible to flood the engine; at least haven’t succeeded in doing that so far;
5. The speed of the engine can be well regulated with the regulator for adding extra air on the rear of the tank;
6. This carburetor design is very simple: no venturi, no petrol jet with needle, no accurate dimensions, no chance for false air- and/or petrol leaks;
7. This carburetor may look somewhat bigger than the classic one, but the contrary is true: in fact it is only a petrol tank with few simple arrangements, integrated in and on this tank;
8. This carburetor cannot overheat because there is no heat conduction from the cylinder to it. The length of the (rubber) connection tube to the intake manifold is not critical at all. I didn't notice any difference between 10 and 50cm tube length! The location for this carburetor is therefore free to choose;
9. Regulation of the petrol level is irrelevant;
10. No risk of stoppages; there are no narrow flood gates and possible contingent dust particles remain visible in the petrol tank. They disappear with draining the tank at the end of a demonstration;
11. No chance for petrol leaks to the outside of the carburetor, and therefore safe and no unpleasant smells.
Limitation of this carburetor compared to the classic venturi carburetor
Autocar gasoline and, to a lesser extent, Coleman Fuel is composed of a large number of different hydrocarbons having a wide range of boiling points. In the conventional venturi carburetor the whole liquid fuel is sucked into the engine cylinder in the form of fine droplets together with the inflowing air so that all the fuel is consumed. However, with this petrol vapor carburetor only the molecular vapors which are entrained at room temperature above the liquid fuel are sucked into the engine cylinder together with the air flowing through the carburetor and this provides the important advantages which are described above. The only drawback is that the heavier hydrocarbon components with boiling points higher than room temperature make little or hardly any vapor above the liquid gasoline so that those components remain in the tank of the carburetor. This is the reason why there is no longer a combustible gas mixture flowing into the cylinder at the moment when all the volatile gasoline components are vaporized having boiling points lower than the room temperature. This segregation phenomenon occurs gradually so that somewhat less additional air must be added to the gas mix with the controller on the carburetor to keep the engine properly running. Finally there will be so few petrol vapor above the liquid present that the engine stops running. It is my experience that at that time approximately 70% of the gasoline is left in the tank that consist mainly of the heavier components with boiling points above room temperature. This gasoline residue must then be replaced with fresh gasoline. Heating up the carburetor tank in a save way is rather difficult and it causes more ore less unstable gas mixtures according to my experiences; so that is not advisable.
The time that an engine can run on this petrol vapor carburetor is dependent on the amount of gasoline in the carburetor and on the engine consumption which in turn depends on the cylinder content and the speed at which the engine is running. To give you an idea, a model engine with a cylinder content of about 10 cc and with a speed of approximately 1000 rpm will run for about 25 minutes with the petrol vapor carburetor with a gasoline content of approximately 30cc as is the case with the "standard" carburetor as I now have drawn on my plans. When the carburetor tank is chosen greater and the cylinder content is smaller and/or the engine speed is lower, the running time of the engine will be proportionally longer. But usually a 10 minute runtime of a model engine will already be more than enough for a successful demonstration so that the benefits of the petrol vapor carburetor than outweigh the only drawback mentioned here.
The principle of this petrol vapor carburetor is therefore not suitable for relatively large (industrial) engines that have to run continuously and for a long time and wherein it is always the intention to consume the entire gasoline.
So, the petrol vapor carburetor is actually intended for relatively small modelling stationary engines where the gasoline consumption basically plays no significant role. In such case, this petrol vapor carburetor is strongly preferred over the conventional venturi carburetor.Finally
It is really a joy to see how reliable and fast the engine starts on this carburetor and how smoothly it runs. No more problems with choking, flooding and sooty or wet spark plugs is truly a big relief!
I assume that this design relieves many builders of internal combustion engines of a ‘carburetor nightmare’, except perhaps some notorious experts in this field.
I dare to postulate that this version of the carburetor in fact is the most possible simple and reliable solution. It is a striking example of how simplicity can bring you the best results.A 3D printed version of this carburetor.
My son-in-law Maarten Pennings recently purchased a 3D printer and made an arrangement with a beautiful housing. He has mastered the necessary software, but that is not surprising because he is a boulder in that. He asked me if I could provide him with a drawing of a part of one of my model engines that would be suitable for a 3D print. Printing a complete combustion engine seems too much of a good thing for the time beeing and it may not be possible because many of the parts have material requirements that plastic does not meet, at least not if the engine has to run. We therefore initially opted for this carburetor because it has no moving parts and it also remains at room temperature. Maarten succeeded in printing a beautiful model that can also be used because the used plastic (PLA) appeared to be resistant to petrol. The video below shows the result and also how well one of my internal combustion engines runs with it.

Final version
Adjuster extra air